
Overview #
In this experiment I used C++ and the WinAPI (Windows API) to build a small GUI tool for adding and removing entries in the desktop right-click menu (the context menu) — entries that launch a program of your choice.
The goals: build a basic GUI application with the WinAPI (a window, buttons, edit boxes), and learn how to manipulate the Windows registry — the heart of OS customization.
Understanding registry manipulation gives you a real sense of how Windows manages settings, which translates directly into deeper system customization and troubleshooting.# The Windows registry and the context menu
The Windows registry is a hierarchical database that centralizes the settings of the Windows OS and the applications installed on it. Everything from OS behavior to hardware settings to user profiles lives there as keys and values.
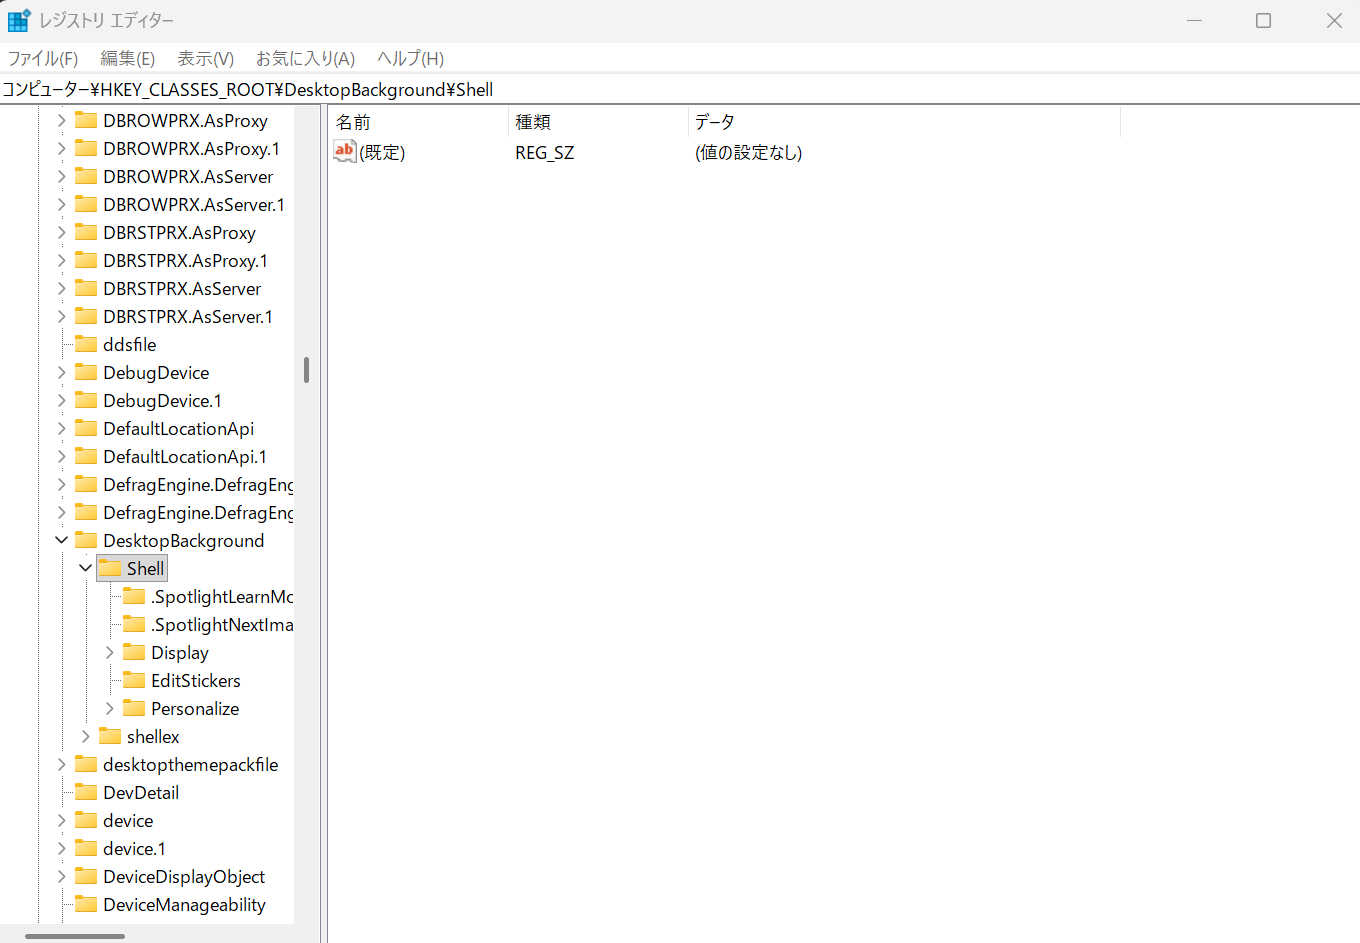
The contents of the context menu (the menu that appears when you right-click an empty space on the desktop) are also defined in the registry. Specifically, you add an item to that menu by defining it under the key HKEY_CLASSES_ROOT\DesktopBackground\Shell.
The tool takes a "display name" and "program path" the user enters in the GUI, and calls the WinAPI registry functions (RegCreateKey, RegSetValueEx, RegDeleteKey) directly to make the changes.
The GUI is built using the traditional WinAPI approach — register a window class, create a window, and run a message loop.
Adding to the context menu #
Pressing the "Add" button calls AddRegistry, which performs two steps:
- Create the entry key: make a key at
HKEY_CLASSES_ROOT\DesktopBackground\Shell\[the display name].- Set its (Default) value to the display name. That string is what appears in the menu.
- Also set the
Iconvalue to the program path so the menu entry shows the executable's icon.
- Create the command key: make a subkey
...\[display name]\Command.- Set its (Default) value to the full program path to launch.
When the user clicks the menu entry, Windows runs the path stored in the Command key.
Removing from the context menu #
Pressing the "Remove" button calls RemoveRegistry, which undoes the additions in reverse order. A registry key can't be deleted while it has subkeys, so you have to delete from the deepest level (Command) up.
C++ code walkthrough #
WinMain and window setup (InitApp, InitInstance) #
WinMain is the entry point of a WinAPI application. InitApp registers a "window class" with the OS — basic appearance and behavior, including the window procedure (WndProc). InitInstance then creates and shows the actual window using CreateWindow. After that, we enter the GetMessage loop (the message loop) and wait for events like user input.
// InitApp: register the window class with the OS
ATOM InitApp(HINSTANCE hInst) {
	WNDCLASSEX wc;
    // (set window style, procedure, icon, etc.)
	return (RegisterClassEx(&wc));
}

// InitInstance: actually create the window
BOOL InitInstance(HINSTANCE hInst, int nCmdShow) {
	HWND hWnd;
	hWnd = CreateWindow(
		szClassName, // class name
		TEXT("Registry Controller"), // title
		WS_OVERLAPPE | WS_SYSMENU, // style
		// (position, size, etc.)
	);
    // (show and update the window)
	return TRUE;
}
Window procedure (WndProc) — WM_CREATE #
WM_CREATE is sent once, immediately after the window is created. This is where we drop the GUI controls into it. We use CreateWindow and CreateWindowEx to place "STATIC" (static text), "EDIT" (text input boxes), and "BUTTON" (push buttons) at the right coordinates.
LRESULT CALLBACK WndProc(HWND hWnd, UINT msg, WPARAM wp, LPARAM lp) {
    // (define static variables)
	switch (msg) {
		case WM_CREATE: {
            // "RegsName" static text
			HWND hRegsNameText = CreateWindowEx( ... TEXT("STATIC"), TEXT(" RegsName "), ... );

            // "ProgPath" static text
			HWND hProgPathText = CreateWindowEx( ... TEXT("STATIC"), TEXT(" ProgPath "), ... );

            // Edit box for the registry name
			hRegsNameEdit = CreateWindowEx( ... TEXT("EDIT"), ... );

            // Edit box for the program path
			hProgPathEdit = CreateWindowEx( ... TEXT("EDIT"), ... );

            // "Add" button
			CreateWindow( TEXT("button"), TEXT("Add"), ... (HMENU)add_BUTTON, ... );

            // "Remove" button
			CreateWindow( TEXT("button"), TEXT("Remove"), ... (HMENU)rm_BUTTON, ... );
			break;
		}
// ( ... omitted ... )
Window procedure (WndProc) — WM_COMMAND #
WM_COMMAND is sent when, for example, a button is clicked. LOWORD(wp) tells you which child window (button) was activated.
For add_BUTTON or rm_BUTTON, we read the current text from the edit boxes (hRegsNameEdit, hProgPathEdit) using GetWindowTextA and pass it to AddRegistry or RemoveRegistry respectively.
		case WM_COMMAND: {
			switch (LOWORD(wp)) {
				case add_BUTTON: {
                    // Read text from the edit boxes
					GetWindowTextA(hRegsNameEdit, regsName, sizeof(regsName));
					GetWindowTextA(hProgPathEdit, progPath, sizeof(progPath));

					AddRegistry(regsName, progPath); // call the add function
					MessageBox(hWnd, TEXT("...added."), ...);
					break;
				}
				case rm_BUTTON: {
                    // Read text from the edit box
					GetWindowTextA(hRegsNameEdit, regsName, sizeof(regsName));
					RemoveRegistry(regsName); // call the remove function
					MessageBox(hWnd, TEXT("...removed."), ...);
					break;
				}
			}
			break;
		}
// ( ... omitted ... )
The add function (AddRegistry) #
The heart of the registry work. We use _stprintf_s to concatenate the base key path (DesktopBackground\Shell\) and the user-supplied name (regsName) into a full path.
RegCreateKey: create the key at the given path. If it already exists, just open it.RegSetValueEx: set a value on the key. The actual data is written using(LPBYTE)regsNameor(LPBYTE)progPath.RegCloseKey: always close the key handle when you're done.
This runs twice — once for the ...\[regsName] key and once for ...\[regsName]\Command.
void AddRegistry(TCHAR* regsName, TCHAR* progPath) {
	HKEY hKey;

    // Build the path string (Shell key)
	TCHAR szKey[] = TEXT("DesktopBackground\\Shell\\");
	TCHAR fullszKey[256];
	_stprintf_s(fullszKey, ...);

    // Build the path string (Command key)
	TCHAR szKey2[] = TEXT("\\Command");
	TCHAR fullszKey2[256];
	_stprintf_s(fullszKey2, ...);

	// 1. Create the Shell key and set values
	if (RegCreateKey(HKEY_CLASSES_ROOT, fullszKey, &hKey) == ERROR_SUCCESS) {
		RegSetValueEx(hKey, NULL, 0, REG_SZ, (LPBYTE)regsName, ...); // (Default) = display name
		RegSetValueEx(hKey, TEXT("Icon"), 0, REG_SZ, (LPBYTE)progPath, ...); // Icon = program path
		RegCloseKey(hKey);
	}

	// 2. Create the Command key and set values
	if (RegCreateKey(HKEY_CLASSES_ROOT, fullszKey2, &hKey) == ERROR_SUCCESS) {
		RegSetValueEx(hKey, NULL, 0, REG_SZ, (LPBYTE)progPath, ...); // (Default) = program path
		RegCloseKey(hKey);
	}
}
The remove function (RemoveRegistry) #
For removal we use RegDeleteKey. This function can't delete a key that has subkeys, so we have to start at the deepest level (fullszKey2, the Command key) and work upward — Command first, then the parent Shell key (fullszKey).
void RemoveRegistry(TCHAR* regsName) {
	// (build path strings — same as AddRegistry)
	TCHAR fullszKey[256];
    // ...
	TCHAR fullszKey2[256];
    // ...

	// Delete keys from the deepest level upward
	LONG result2 = RegDeleteKey(HKEY_CLASSES_ROOT, fullszKey2); // 1. delete Command key
	LONG result1 = RegDeleteKey(HKEY_CLASSES_ROOT, fullszKey);  // 2. delete Shell key
}
Running it #
Important caveats before you run this #
This code is for learning the WinAPI and registry manipulation. Editing the Windows registry calls for real care.
Risk of corrupting the registry #
The registry is the central database that controls how Windows behaves. If you edit or delete the wrong key or value, the system can become unstable — and in the worst case, it won't boot. Strongly recommended: back up the registry, or create a system restore point, before using this tool.
Administrator privileges required #
HKEY_CLASSES_ROOT (HKCR) is a system-wide setting, and writes to it require administrator privileges. To run the program (.exe), right-click the executable and choose "Run as administrator".
Launching #
Once you've built the program, run the executable with "Run as administrator".
A window opens with input fields for the program name and path, plus the buttons.

To demonstrate, I'll add Bandicam (a screen recorder I use a lot) to the context menu.
Type a name for the program into RegsName (anything you like), and put the path to the program into ProgPath.
Click "Add". A confirmation window appears, and the registry entry is added.


When you no longer need the entries, type the name into the input box and click "Remove". A confirmation window appears, and the registry entry is removed.


This project tweaks the registry to add a launcher for your program of choice to the context menu. Building an interactive program with the WinAPI was a good lesson in event-driven coding (handle a button-press event, etc.) — quite different from CUI work, with both its challenges and its appeal.
In particular, the registry is a frequent target of malicious attackers, so learning how to manipulate it programmatically is genuinely useful from a security perspective. A common malware pattern is to write its own startup configuration to the registry to "persist" itself — by touching RegCreateKey and RegSetValueEx directly, that mechanism is no longer abstract; I now understand it at the code level.
Manipulating the registry — touching the heart of the system — comes with risk. But that is exactly why understanding it is essential for defenders, too.


COMMENTS 1